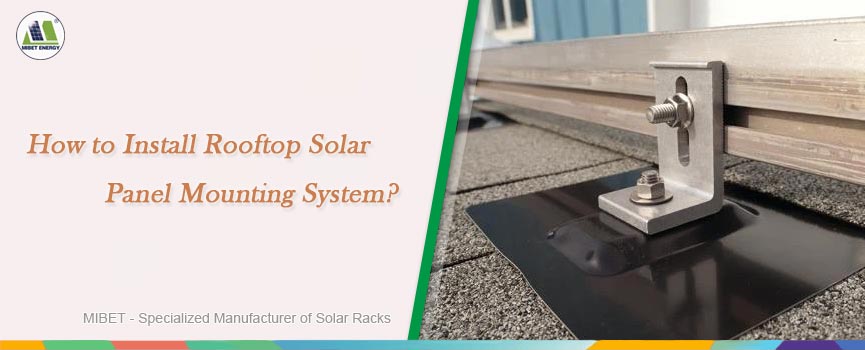
How to Install Rooftop Solar Panel Mounting System?
Solar panels are a viable option for sustainable home energy production. Although initially expensive, the initial investment in solar panels pays off as energy costs rise, leading to substantial long-term savings.
Installing a rooftop solar panel system entails a series of complex steps, requiring careful planning, specialized tools, and strict adherence to safety standards. If you are considering installing solar panels on your roof, this blog post provides valuable information.
We will share knowledge related to the selection, installation, and maintenance of solar panel mounting systems. It includes an introduction to the different rooftop solar panel mounting systems and important factors for installers to consider.
What to Consider When Installing Solar Panels on Rooftop?
Roof Condition
Before you proceed with your solar panel installation, confirm that your roof is structurally sound. Given that solar panels have a lifespan that can extend up to 25 years, it's vital that your roof is robust.
If you discover any damage, it's advisable to repair your roof before installing the panels. Addressing any issues beforehand will avoid the inconvenience and additional costs of having to detach and reinstall the panels for roof repairs later.
Location of Your Home
Consider the placement of your house. Could upcoming changes, like the growth of recently planted trees, eventually obstruct sunlight to your roof? It's essential to ensure that the section of the roof chosen for your panels receives optimal sunlight exposure.
Roof Load Capacity
It's important to verify if your roof can handle the additional weight of solar panels. Although solar panels typically weigh between 2 to 4 pounds per square foot and are generally not considered heavy, it's prudent to have a structural engineer assess whether your roof can adequately support your planned solar installation. This step ensures safety and structural integrity.
Installing Solar Panels on Different Types of Roofs
The materials and structure of a roof impact how solar panels are installed. Different roof types, including various materials and shapes, require distinct installation methods to ensure optimal safety and energy production efficiency.
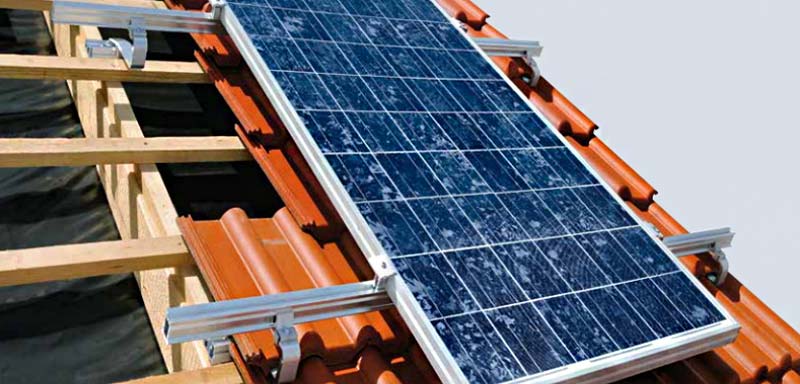
Fixing Solar Panels to a Tiled Roof
Pre-Installation Inspection and Measurements
The initial step involves measuring your roof either remotely or on-site. Installers will evaluate the best locations for the panels considering space, pitch, and orientation, and then pinpoint where to place brackets and rails. Additionally, the placement for the inverter and wiring routes will be determined.
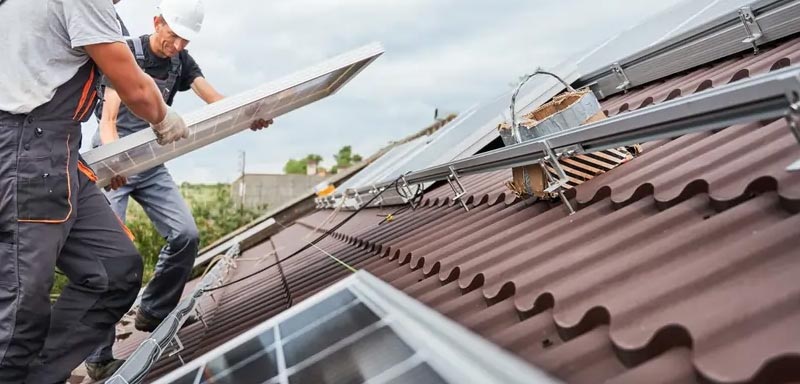
Removing Tiles
Upon accessing the roof, the installers will start by removing specific tiles to prepare for the brackets' installation. This allows for direct access to the rafters and underlying roof structure, facilitating secure bracket attachment.
Mounting the Brackets
Installers will fix stainless steel hook brackets directly onto the rafters. After securing the brackets, the tiles are replaced and modified as necessary to ensure a flush fit and maintain the roof's integrity. This includes grinding or cutting tiles to accommodate the brackets and replacing any that are damaged.
Experienced installers will make sure that the brackets are securely attached and that the roof remains waterproof. If necessary, they will also install additional flashing and waterproofing materials around the brackets.
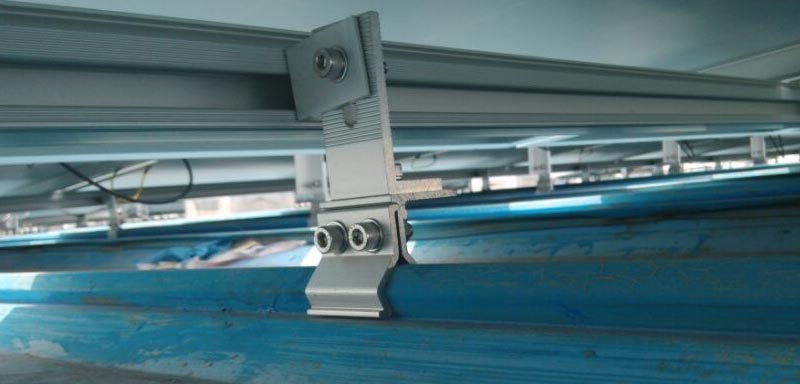
Installing the Rail System
Following bracket installation, aluminum alloy rails are set across the roof and attached to these brackets. This rail system acts as the foundational support for the solar panels.
Installing the Solar Panels
With the groundwork complete, the solar panels can be mounted. They are attached to the rails using clips that secure to the edges of the panels. This bracket design also facilitates easy panel removal for maintenance or repairs. A gap between the panels and roof tiles ensures airflow, helping to keep the panels cool during summer months.
Connecting the Electrics
As panels are installed, electrical cables are interconnected to form a 'string' which is routed through the roof to the inverter. The installation team handles all on-roof electrical setups and ensures a seamless connection to home systems. Most modern installations allow for data monitoring through smart devices or web platforms, without needing physical access to the inverter except for maintenance.
Typically, this installation process requires 1-2 days and involves minimal modifications to your home, primarily around tile adjustments and wiring pathways. This pathway is typically created by drilling a small hole.
This tile roof installation video will help you better understand: https://www.youtube.com/watch?v=7hY95JosjI0
Fixing Solar Panels to a Metal Roof
The methodology for securing solar panels onto metal roofs varies based on the specific roof type, with three primary:
Standing-Seam Metal Roofs
Often, you won't need rails to install solar panels on a standing seam metal roof. You can directly secure the panels to the roof's seams using specialized clips. If seam placement isn't ideal for your solar panels, you can attach rails to the seams and then secure the solar panels to those rails. This method is particularly advantageous as it involves no drilling and thus no penetration of the roof. Mibet offers a durable and cost-effective clamp for standing seam roofs that does not compromise the roof's integrity.
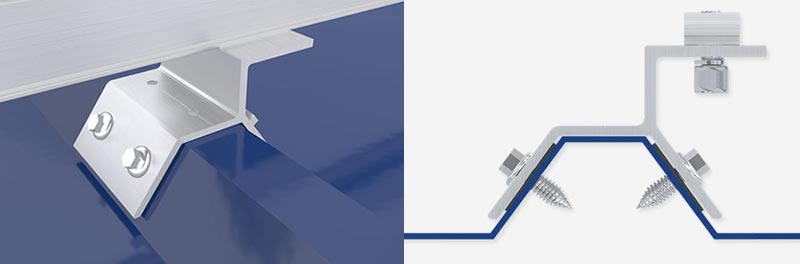
Corrugated Roofs
For corrugated roofs, you'll need to attach rails directly to the ribs. This will use special hardware secured with two or four screws, which does require penetrating the roof. High-quality brackets typically include rubber gasket seals to prevent leaks, eliminating the need for messy sealants. However, you must verify with the roof manufacturer before installation to ensure that these penetrations do not invalidate your warranty. Mibet provides stainless steel hanger bolts with sealing washers, offering easy and quick anchoring to metal substructures. These corrugated solar fastening systems are compatible with different roof types, including trapezoidal and sinusoidal.
Exposed Fastener Trapezoidal Metal Roof
These roofs are structurally more rigid than standing seam roofs and are less affected by temperature changes. However, they demand thorough weather-proofing due to the susceptibility of the exposed fasteners to the elements. It's vital to select corrosion-resistant sealants or weather-proof mounts for these roofs. Installation might also require a high-mount clamp that sits above the water drainage plane. It's essential for installers to consider these factors carefully when planning a solar setup for this roof type.
Trapezoidal roofing often features flatter spaces between peaks, with varying ridge heights. Therefore, brackets for trapezoidal metal roofs come in different shapes and are installed similarly to corrugated metal brackets. Brackets designed for these roofs need to match the trapezoidal profile closely to ensure precise placement of drill holes above the roof's base level. It remains standard practice to apply sealant to prevent any potential leaks.
This metal roof installation video will help you better understand: https://www.youtube.com/watch?v=VeTD3ci1GC4
Fixing Solar Panels to a Flat Roof
The installation of solar panels on a flat roof begins with pre-installation evaluations to ascertain the best placement for energy efficiency. It's essential to consider the mounting systems and their positioning to maximize exposure to sunlight while avoiding shaded areas. Furthermore, maintaining and monitoring the system is vital for ensuring its long-term efficacy.
Planning Phase
Start by assessing the roof's capability to bear the weight of the panels along with their mounting systems. You should also check if the roof's slope and orientation are favorable for optimal sunlight absorption. If your roof is steep, you might need to consider alternative locations or use angled mounts or tilted panels.
Next, analyze the building's energy consumption to determine your energy requirements and the number of panels needed. This calculation will depend on the roof space available and your energy production goals.
Before proceeding with the installation, ensure you obtain all necessary permits and approvals to comply with local regulations and safety standards.
Installation of the Flat Roof Solar System
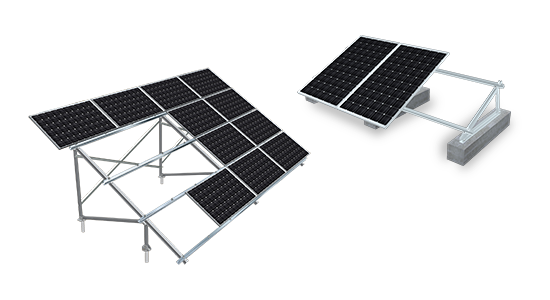
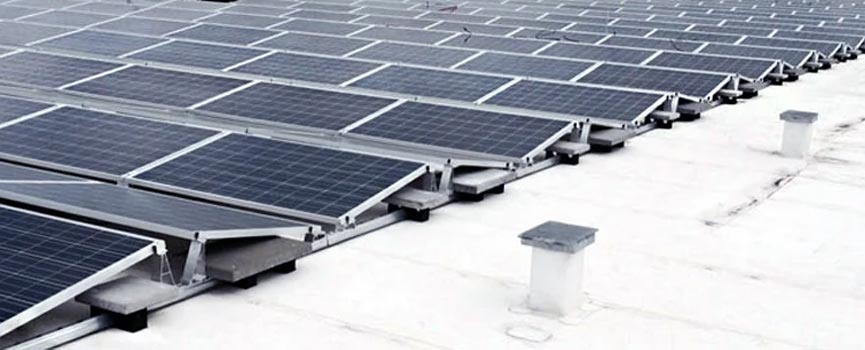
Several types of mounting systems can be used to affix solar panels to flat roofs, including ballasted, penetrating, and triangular elevated options.
A ballast system relies on weights to secure the panels in place, whereas penetration mount systems fix the panels directly to the roof structure. The triangular elevated mount, using a concrete block foundation, provides stability without harming the roof.
Next, install rails and brackets on the roof to connect and secure the solar panels.
Wiring Flat Roof Solar Panels
Begin the wiring process by installing a combiner box, which consolidates the wiring and allows the panels to connect in parallel. This box should include a circuit breaker or fuse to safeguard the system against electrical overloads.
Connect wires to the positive and negative terminals of each solar panel, leading them back to the combiner box. Ensure that the wires are adequately sized to manage the system's current and voltage requirements.
These wires then lead to the inverter, which converts the direct current (DC) from the panels into alternating current (AC) usable by the building. Install the inverter close to the building's electrical panel.
Lastly, connect the system to the building's electrical panel.
Final Inspections and Testing
The final step is crucial to ensure the solar power system is safe, operational, and compliant with all standards and regulations.
This process includes checking wiring and connections for faults, ensuring the inverter and other equipment are functioning correctly, and conducting a performance test of the entire solar power system.
This metal roof installation video will help you better understand: https://www.youtube.com/watch?v=A1DsT2mVSbA
Do You Need Permission to Install Solar Panels on Your Roof?
Before you install solar panels on your roof, you must determine if you need permission. State and local laws regulate solar panel installation, so verify if they permit it in your area and if any specific rules or restrictions apply.
Typically, you'll need to secure a building or electrical permit. Additionally, you may need to get approval from your homeowners association, local utility providers, and municipal authorities.
If you are considering solar panel installation, begin the process early. Arranging inspections and awaiting permit approvals can be the most time-consuming parts of the installation process. Also, keep in mind that some areas might require only certified professionals to perform the installation.